Guide
How to Sit Properly at a Desk: The Complete Ergonomics Guide (2026)
How to Sit Properly at a Desk: The Complete Ergonomics Guide (2026) article.

The average desk worker sits for 10+ hours per day, and research from the Annals of Internal Medicine shows that prolonged sitting with poor posture increases your risk of chronic back pain by 60%, neck strain by 45%, and repetitive strain injuries by 35%. This guide gives you a step-by-step system to set up your desk, chair, and monitor for proper ergonomic posture — plus the equipment, habits, and movement breaks that protect your body over the long term.
Most people know they should "sit up straight," but that advice is incomplete and often misunderstood. Proper desk posture isn't about rigidly holding one position — it's about aligning your body so that your muscles, joints, and spine share the load evenly, reducing the cumulative stress that leads to pain and injury. Whether you work from home, in a corporate office, or a hybrid setup, the principles are identical.
This guide covers everything from the foundational rules of desk ergonomics through step-by-step setup, common mistakes and fixes, essential equipment, and the movement habits that make sitting sustainable.
By Dr. Michael Torres, Occupational Health Physiotherapist — Published March 20, 2026
Table of Contents
<video autoplay muted loop playsinline poster="/images/articles/how-to-sit-properly-at-a-desk-video-thumb.jpg" style="width:100%;border-radius:8px;margin:1.5rem 0;"><source src="/videos/how-to-sit-properly-at-a-desk-demo.mp4" type="video/mp4"></video>
- The 5 Golden Rules of Desk Ergonomics
- Step-by-Step Desk Setup Guide
- Good vs Bad Posture: What the Difference Looks Like
- Ergonomic Equipment That Helps
- Common Posture Problems and How to Fix Them
- The 20-20-20 Rule and Movement Breaks
- FAQ
- Conclusion
- Sources and Methodology
The 5 Golden Rules of Desk Ergonomics
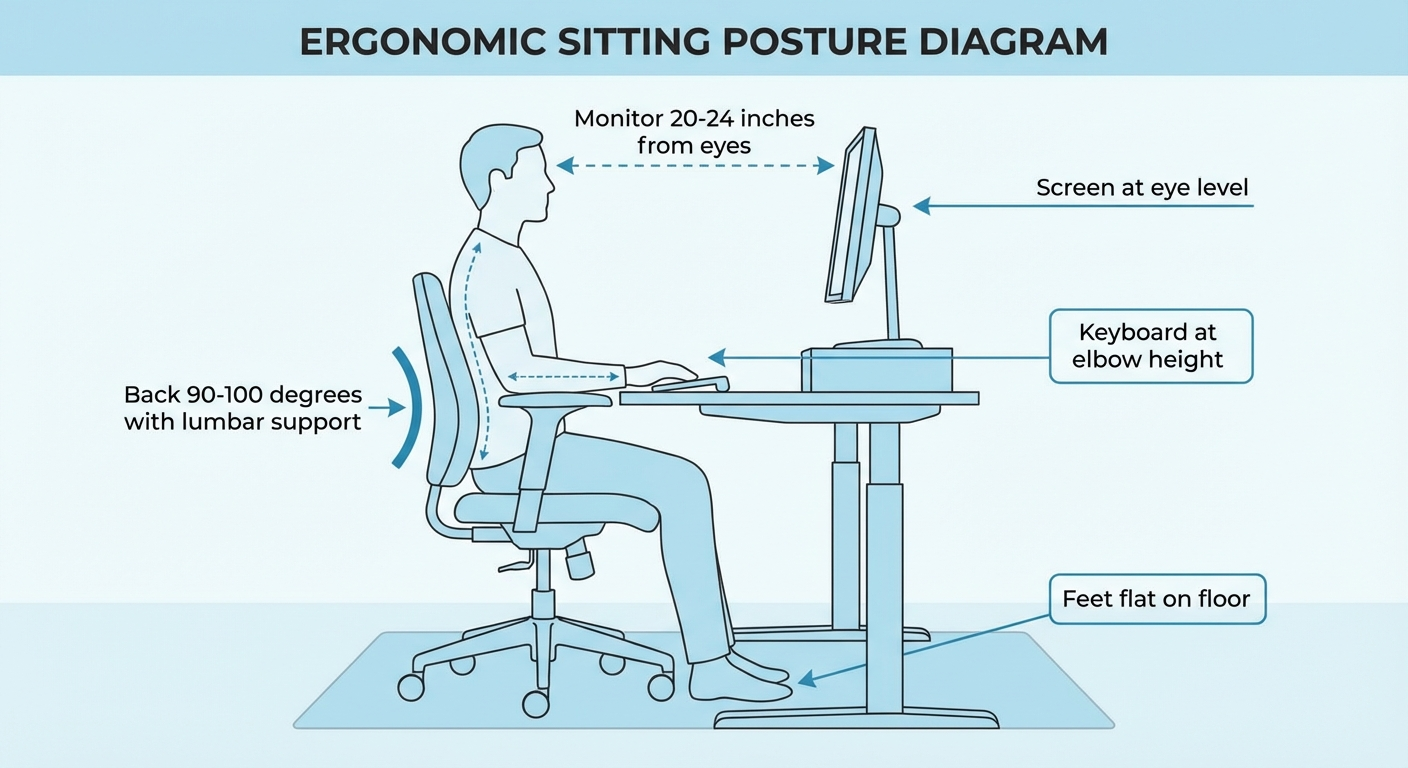
Before diving into the detailed setup, these five rules form the foundation of every properly configured workstation. If you get these right, you eliminate roughly 80% of posture-related discomfort.
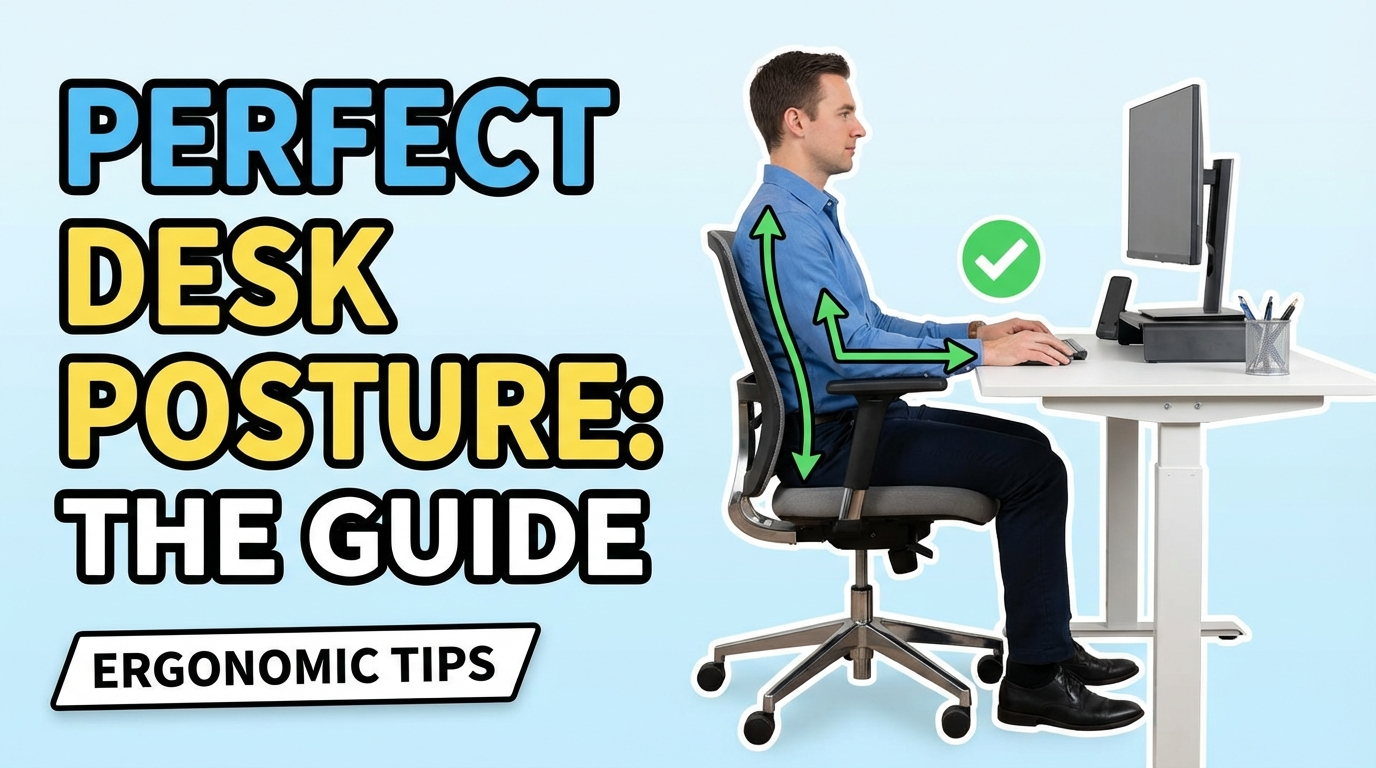
Rule 1: Keep Your Feet Flat on the Floor
Your feet should rest flat on the floor (or on a footrest) with your knees bent at approximately 90 degrees. When your feet dangle or tuck under your chair, blood flow to your lower legs is restricted, your hip flexors tighten, and your pelvis tilts backward — which flattens your lumbar curve and sets off a chain reaction of poor alignment up your entire spine.
The test: While seated, slide your hand between the front edge of your seat and the back of your knee. You should be able to fit two to three fingers comfortably. If the seat presses into the back of your knee, the seat pan is too deep, or the chair is too high.
Rule 2: Support Your Lower Back
Your chair's backrest should make firm contact with your lumbar spine — the inward curve in your lower back. This support maintains your spine's natural S-curve rather than allowing it to collapse into a C-shape (the classic slouch). If your chair has adjustable lumbar support, position it so the pad sits in the curve of your lower back, roughly at belt level.
If your chair doesn't have built-in lumbar support, a rolled-up towel or a dedicated lumbar cushion placed between your lower back and the backrest provides the same effect. The key is consistent pressure that prevents your pelvis from rolling backward.
Rule 3: Position Your Arms at 90–100 Degrees
Your elbows should rest at your sides, bent at a 90- to 100-degree angle, with your forearms roughly parallel to the floor. Your keyboard and mouse should be at this same height so that you can type and navigate without lifting your shoulders or extending your wrists.
Why it matters: When your keyboard is too high, your shoulders shrug upward, engaging your upper trapezius muscles continuously. Over a full workday, this creates the shoulder and neck tension that most desk workers experience by mid-afternoon. When your keyboard is too low, your wrists flex upward, compressing the carpal tunnel and increasing the risk of repetitive strain injury.
Rule 4: Place Your Monitor at Eye Level
The top of your monitor screen should be at or slightly below eye level, and the screen should be approximately 20 to 26 inches from your eyes (roughly an arm's length). This positioning allows you to view the screen with a slight downward gaze of about 15 to 20 degrees, which is the natural resting position for your eyes and neck.
For laptop users: A laptop screen is almost always too low when placed flat on a desk, which forces a forward-head posture. Use a laptop stand to raise the screen to eye level, and connect an external keyboard and mouse. This single adjustment eliminates the most common ergonomic problem among remote workers.
Rule 5: Sit Back in Your Chair
Your back should be in contact with the backrest, not perched on the front edge of the seat. When you sit forward, you lose all the support your chair is designed to provide — the lumbar curve, the backrest angle, the recline tension — and your spinal muscles take over the full load of holding you upright.
The optimal backrest angle is between 100 and 110 degrees (slightly reclined from vertical). This angle reduces disc pressure in the lumbar spine by up to 25% compared to sitting perfectly upright at 90 degrees, according to research published in the journal Spine.
Step-by-Step Desk Setup Guide
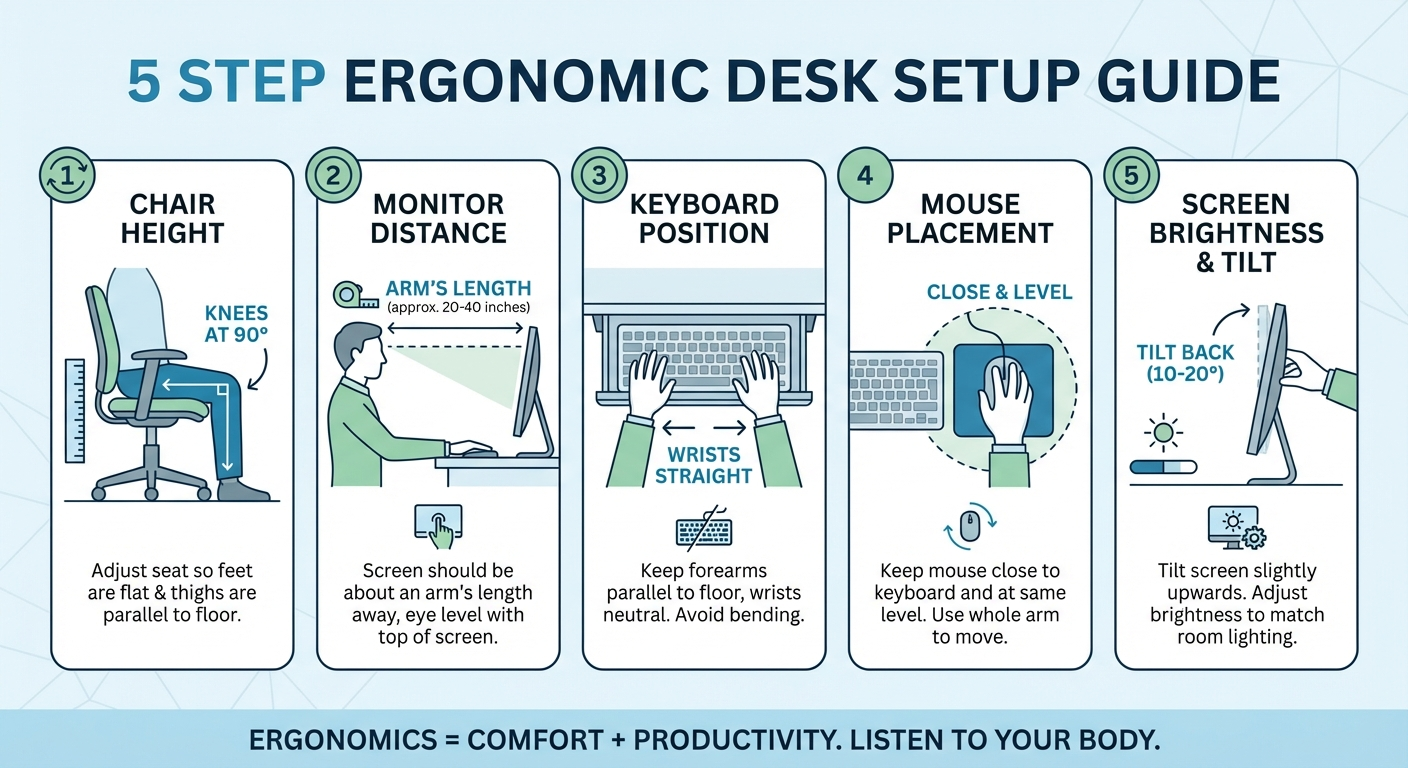
Follow this sequence exactly. The order matters because each adjustment builds on the previous one.
Step 1: Adjust Your Chair Height
Sit in your chair with your feet flat on the floor. Adjust the seat height until your thighs are parallel to the floor and your knees are bent at approximately 90 degrees. Your feet should carry some of your body weight — not all of it (that means the seat is too high) and not none of it (that means the seat is too low).
If your desk is too high: Raise your chair to bring your elbows level with the desk surface, then use a footrest to support your feet. This is one of the most common ergonomic scenarios in offices with non-adjustable desks.
If your desk is too low: This is harder to solve. Desk risers (blocks that go under the desk legs) are inexpensive and effective. Alternatively, if you're shopping for a new desk, prioritize height adjustability — even a manual crank desk gives you the range you need.
Step 2: Set Your Monitor Position
Place your monitor directly in front of you (not off to one side) at arm's length distance. Raise or lower it until the top of the screen is at or slightly below your eye level. If you use a dual-monitor setup, position the primary monitor directly in front of you and angle the secondary monitor 15 to 30 degrees to one side.
Height adjustment options:
- A monitor arm (the gold standard — allows infinite height, depth, and angle adjustment)
- A monitor stand or riser
- A stack of books (functional but not aesthetically ideal)
The key is getting the height right. A monitor that's even two inches too low will cause you to tilt your head forward, adding up to 40 pounds of effective load to your cervical spine over the course of a workday.
Step 3: Position Your Keyboard and Mouse
Place your keyboard directly in front of your monitor so that the B key (or the spacebar center) aligns with your navel. This prevents the subtle torso rotation that happens when your keyboard is off-center. Your mouse should be immediately beside the keyboard at the same height.
Keyboard tilt: Most keyboards come with flip-out feet that tilt the back edge upward. Do not use them. A flat or slightly negative tilt (front edge higher than back edge) keeps your wrists in a neutral position. Positive tilt forces wrist extension, which increases carpal tunnel pressure.
Keyboard tray vs desk surface: If your desk surface positions the keyboard too high (causing shoulder shrugging), a pull-out keyboard tray mounted under the desk is the most effective solution. Look for one with a negative-tilt option and enough depth for both keyboard and mouse.
Step 4: Adjust Your Armrests
If your chair has armrests, adjust them so they support your forearms at the same height as your keyboard. Your shoulders should be relaxed and down — not shrugging up to reach the armrests and not dropping down because the armrests are too low.
Width adjustment: If your armrests push your elbows outward, narrow them. Your upper arms should hang naturally at your sides. If the armrests force your elbows away from your body, they're doing more harm than good — remove them entirely rather than sit with splayed arms.
Step 5: Check Your Screen Settings
Adjust your monitor brightness to match the ambient light in your room. A screen that's significantly brighter or dimmer than your surroundings forces your pupils to constantly adjust, which accelerates eye fatigue. Tilt the screen back 10 to 20 degrees to eliminate glare from overhead lighting.
Text size: If you find yourself leaning forward to read text, increase the font size or display scaling rather than moving closer. On Windows, go to Settings → Display → Scale and layout. On macOS, go to System Settings → Displays → Resolution.
Good vs Bad Posture: What the Difference Looks Like
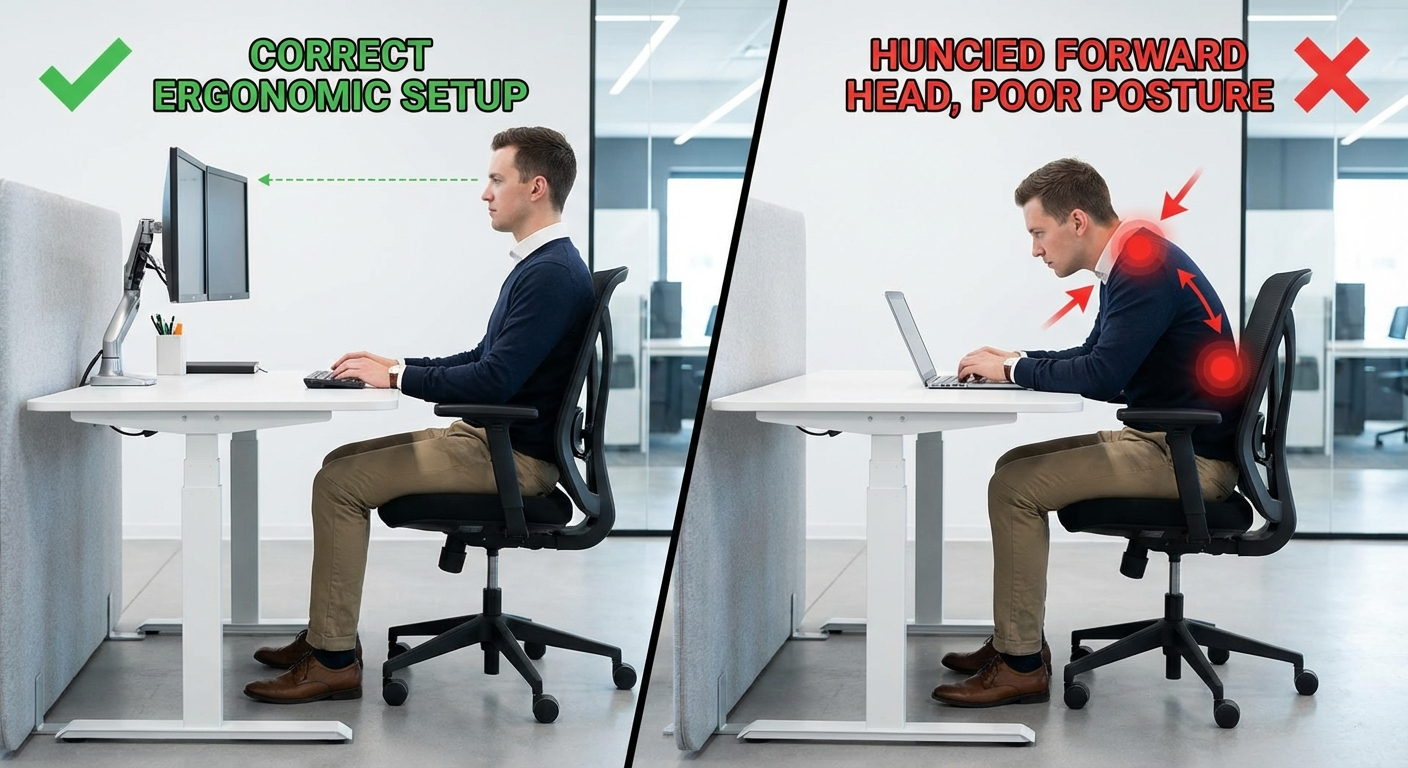
Understanding the visual difference between good and bad posture helps you self-correct throughout the day. Here's what to watch for:
Signs of Good Posture
- Ears over shoulders: Your ear canals align vertically with the middle of your shoulder joints when viewed from the side.
- Relaxed shoulders: Your shoulders sit down and back, not hunched up toward your ears or rolled forward.
- Neutral wrists: Your wrists are straight, not bent upward (extension) or downward (flexion), and not angled to either side.
- Open hip angle: Your thighs slope slightly downward from hip to knee, creating an angle of 90 to 110 degrees at the hip.
- Supported lumbar curve: There is a visible inward curve in your lower back, maintained by the chair's backrest.
Signs of Bad Posture
- Forward head: Your head juts forward past your shoulders. For every inch of forward head posture, the effective weight on your cervical spine increases by approximately 10 pounds.
- Rounded shoulders: Your shoulders roll forward, collapsing your chest and compressing your thoracic spine.
- Flat lower back: Your lumbar curve has disappeared, meaning your pelvis has tilted backward and your weight is concentrated on your tailbone rather than distributed across your sitting bones.
- Crossed legs: Crossing your legs rotates your pelvis, creates asymmetric loading on your spine, and restricts blood flow to your lower extremities.
- Perched on seat edge: You're sitting on the front third of the seat with no back contact, meaning your muscles are doing all the work your chair should be doing.
The Posture Reset
Every 30 minutes, run through this quick check:
- Are my feet flat on the floor?
- Is my back touching the backrest?
- Are my shoulders down and relaxed?
- Is my head over my shoulders (not forward)?
- Are my wrists neutral?
This takes five seconds and prevents the gradual slide into poor posture that happens unconsciously over time.
Ergonomic Equipment That Helps
The right equipment makes proper posture easier to maintain. You don't need to buy everything at once — start with whatever addresses your biggest current problem.
| Equipment | Primary Problem It Solves | Price Range | Priority Level |
|---|---|---|---|
| Ergonomic Office Chair | Lumbar pain, slouching, no support | $200–$1,500+ | Essential |
| Monitor Arm | Neck strain, forward head posture | $25–$150 | High |
| Lumbar Support Cushion | Lower back gap in existing chair | $20–$60 | High |
| Ergonomic Keyboard | Wrist pain, carpal tunnel symptoms | $50–$200 | Medium |
| Adjustable Footrest | Dangling feet, thigh pressure | $20–$50 | Medium |
| Laptop Stand | Screen too low (laptop users) | $20–$80 | High (laptop users) |
| Ergonomic Mouse | Forearm rotation, wrist strain | $25–$100 | Medium |
Ergonomic Office Chair
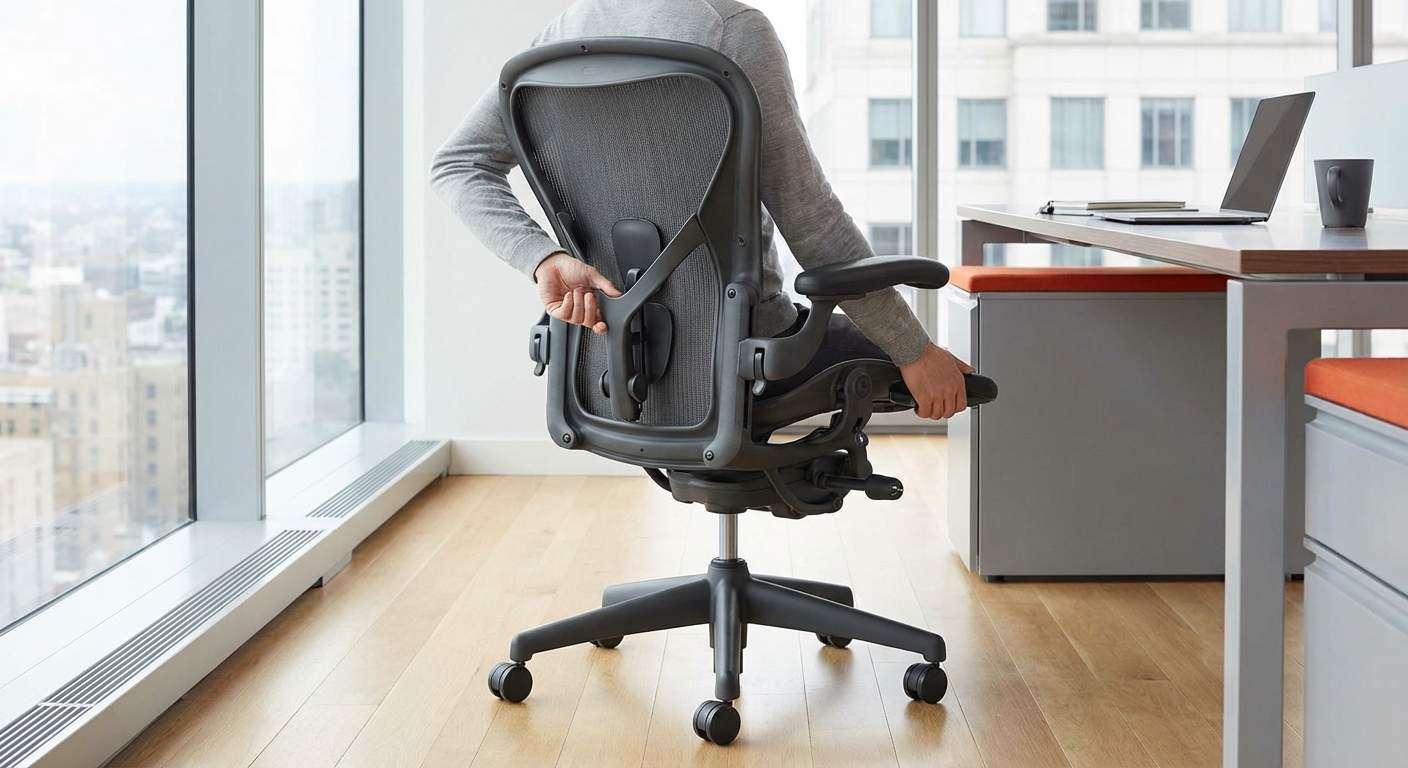
A quality ergonomic chair with adjustable lumbar support, seat height, armrests, and recline is the single most impactful investment you can make. The Herman Miller Aeron remains the gold standard, but excellent options exist at every price point.
Key features to prioritize: Adjustable lumbar (height and depth), synchronized tilt mechanism, seat depth adjustment, and breathable mesh back.
If you're looking for options that won't break the bank, see our list of the best ergonomic office chairs under 300 dollars. For the absolute top picks, browse our best ergonomic office chairs 2026 roundup.
Browse Ergonomic Office Chairs on Amazon
</div> <div style="border:1px solid #e5e7eb;border-radius:12px;padding:1.5rem;background:#fafafa;">Monitor Arm
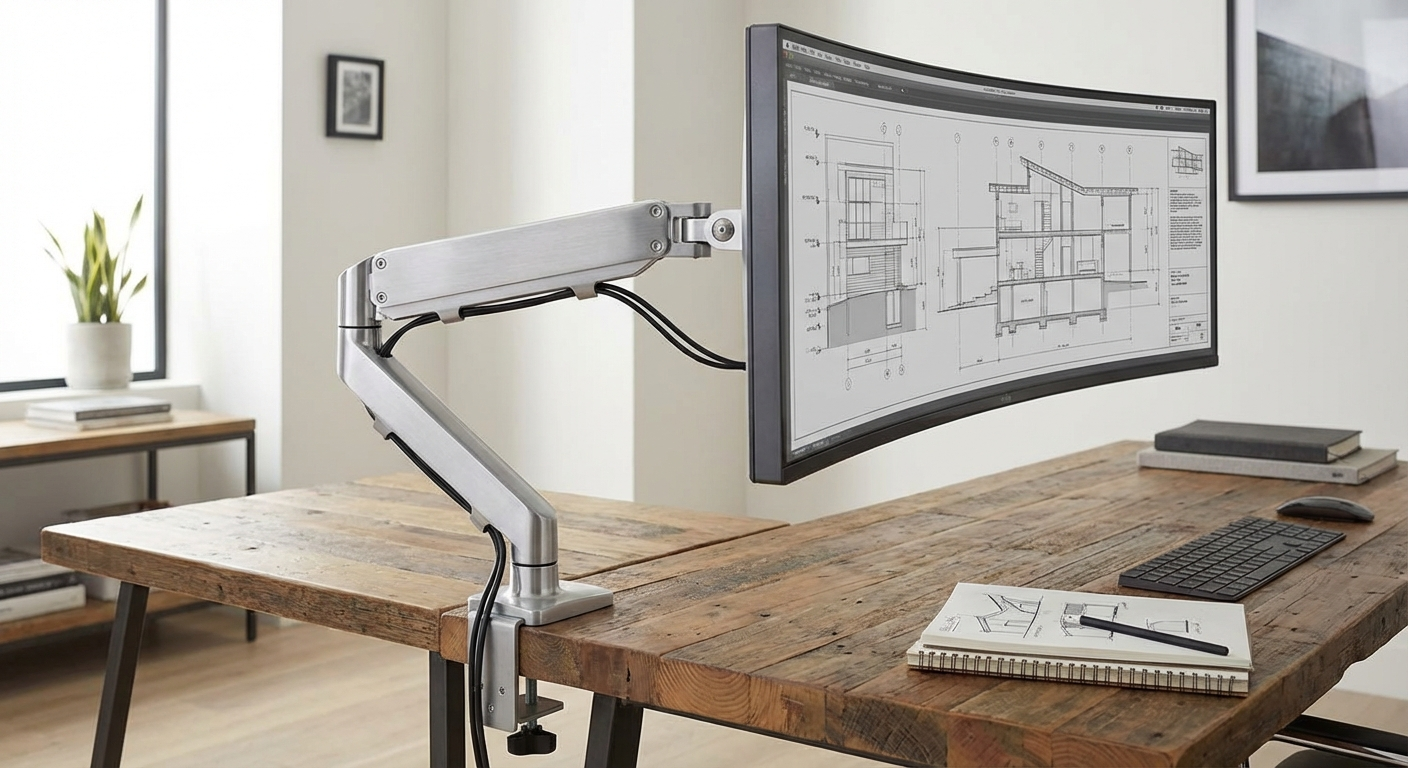
A monitor arm lets you position your screen at exactly the right height, distance, and angle — and change it instantly. Unlike a fixed stand, an arm accommodates different tasks (leaning back to read vs sitting upright to type) and different users at a shared desk.
What to look for: Gas-spring mechanism for smooth adjustment, VESA compatibility (75x75 or 100x100mm), cable management, and a clamp or grommet mount that fits your desk thickness.
</div> <div style="border:1px solid #e5e7eb;border-radius:12px;padding:1.5rem;background:#fafafa;">Lumbar Support Cushion
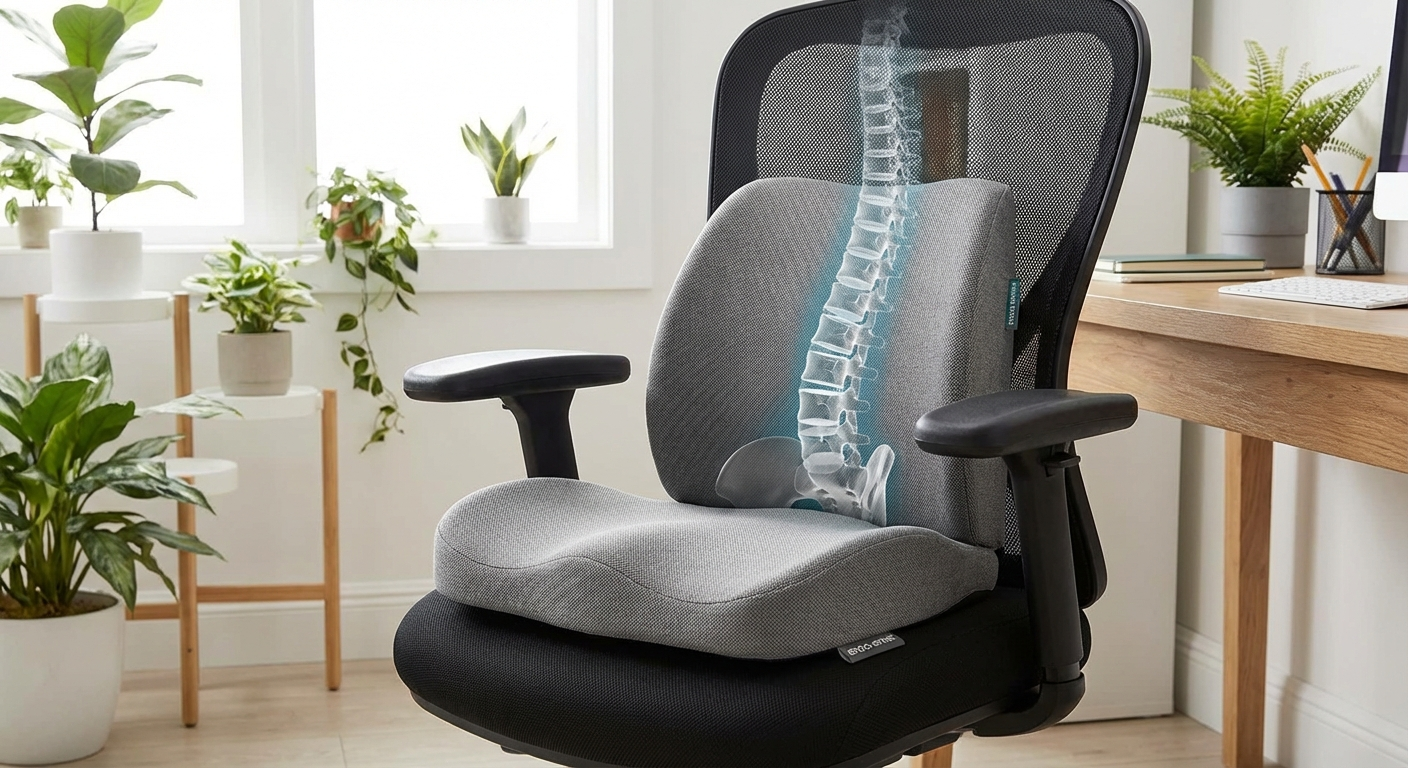
If your chair's built-in lumbar support is insufficient or non-existent, a dedicated lumbar cushion fills the gap. Memory foam cushions conform to your spine's curve and provide consistent pressure throughout the day.
Fit tip: The cushion should sit in the curve of your lower back, roughly between your belt line and the bottom of your rib cage. If it's too high, it pushes your shoulders forward. If it's too low, it doesn't support the lumbar curve.
Browse Lumbar Support Cushions on Amazon
</div> <div style="border:1px solid #e5e7eb;border-radius:12px;padding:1.5rem;background:#fafafa;">Ergonomic Keyboard
A split or tented ergonomic keyboard positions your hands, wrists, and forearms in a natural alignment rather than forcing them into the pronated, ulnar-deviated position that standard flat keyboards require. If you experience wrist pain, finger numbness, or forearm tension, switching your keyboard is one of the highest-impact changes you can make.
Options: Split keyboards (like the Kinesis Freestyle2) separate the two halves entirely. Tented keyboards (like the Logitech Ergo K860) angle the center upward to reduce forearm pronation. Both are significant improvements over flat keyboards.
You might also want to pair it with an ergonomic mouse to complement your desk setup — vertical mice reduce forearm rotation and wrist strain.
Browse Ergonomic Keyboards on Amazon
</div> <div style="border:1px solid #e5e7eb;border-radius:12px;padding:1.5rem;background:#fafafa;">Adjustable Footrest
If your desk is too high and raising your chair leaves your feet dangling, an adjustable footrest restores the critical ground-contact rule. A good footrest also lets you shift foot positions throughout the day, which promotes blood flow and reduces lower-leg fatigue.
Features that matter: Adjustable height (at minimum two positions, ideally continuously adjustable), non-slip surface, sufficient width for both feet, and a slight tilt angle that keeps your ankles in a neutral position.
Browse Adjustable Footrests on Amazon
</div> </div>Common Posture Problems and How to Fix Them
Even with a perfect setup, habits and fatigue lead to predictable posture breakdowns. Here are the most common problems I see in my clinical practice and the specific fixes for each.
Forward Head Posture ("Tech Neck")
What it looks like: Your head drifts forward so that your ears are in front of your shoulders. This is the single most common posture problem among desk workers, and it's directly caused by looking at screens that are too low or too far away.
The biomechanical cost: Your head weighs 10 to 12 pounds in a neutral position. For every inch it moves forward, the effective load on your cervical spine increases by roughly 10 pounds. At a typical forward-head position of 2 to 3 inches, your neck muscles are holding 30 to 40 pounds all day.
The fix:
- Raise your monitor so the top of the screen is at eye level.
- Move the monitor closer — it should be 20 to 26 inches from your eyes.
- Increase text size so you don't lean forward to read.
- Practice chin tucks: gently draw your chin straight back (not down) to stack your head over your spine. Hold for 5 seconds, repeat 10 times. Do this every hour.
Slouching and Lower Back Pain
What it looks like: Your lower back has flattened against the chair back (or isn't touching the chair at all), your pelvis has rolled backward, and your weight rests on your tailbone rather than your sitting bones.
The biomechanical cost: A slouched position increases disc pressure in the lumbar spine by 40 to 90% compared to a supported upright position, according to Nachemson's classic intradiscal pressure studies. Over months and years, this accelerates disc degeneration and contributes to herniation risk.
The fix:
- Sit back in your chair until your back contacts the backrest.
- Adjust lumbar support to fill the curve of your lower back — learn how to adjust your office chair correctly for step-by-step instructions.
- Set your backrest recline to 100–110 degrees (slightly reclined).
- If your chair doesn't have adequate lumbar support, add a lumbar cushion.
Shoulder Shrugging and Neck Tension
What it looks like: Your shoulders are elevated toward your ears, your upper trapezius muscles are visibly tense, and by the end of the day you feel tightness or pain across the tops of your shoulders and the base of your skull.
The biomechanical cost: Sustained shoulder elevation engages the upper trapezius, levator scapulae, and cervical paraspinal muscles in an isometric contraction all day. This creates trigger points, restricts blood flow to the muscles, and can cause tension headaches that radiate from the base of the skull forward.
The fix:
- Lower your keyboard and mouse so your elbows rest at 90 degrees with your shoulders completely relaxed.
- Adjust armrests to support your forearms at keyboard height — your shoulders should not lift to reach them.
- Practice shoulder drops: inhale and deliberately shrug your shoulders up to your ears, hold for 3 seconds, then exhale and let them drop completely. Repeat 5 times.
- Check your phone habits — holding a phone between your ear and shoulder is a major contributor. Use a headset or speakerphone.
Wrist Pain and Carpal Tunnel Symptoms
What it looks like: Tingling, numbness, or pain in your fingers, hands, or wrists, especially the thumb, index, and middle fingers. Symptoms often worsen at night or during extended typing.
The biomechanical cost: Wrist extension (bending your wrist upward, as happens with a tilted keyboard) and ulnar deviation (angling your wrist toward your pinky finger, as happens with a standard keyboard) compress the carpal tunnel and increase pressure on the median nerve by 2 to 5 times compared to a neutral wrist position.
The fix:
- Position your keyboard so your wrists are straight and neutral — not bent up, down, or to either side.
- Remove the keyboard feet (the flip-out legs that tilt the back edge up).
- Use a wrist rest for pauses between typing only — do not rest your wrists on it while actively typing, as this creates a pressure point on the carpal tunnel.
- Consider a split or tented ergonomic keyboard if symptoms persist.
Eye Strain and Headaches
What it looks like: Dry, burning, or tired eyes; difficulty focusing; headaches centered behind the eyes or across the forehead; blurred vision at the end of the day.
The biomechanical cost: Staring at a fixed distance for extended periods causes the ciliary muscles (which control lens focus) to lock in a contracted state. Combined with reduced blink rate (which drops from 15–20 blinks per minute to 3–4 when staring at a screen), this produces the constellation of symptoms known as computer vision syndrome, which affects up to 90% of desk workers.
The fix:
- Follow the 20-20-20 rule (detailed in the next section).
- Position your screen 20 to 26 inches from your eyes.
- Adjust screen brightness to match your room's ambient light.
- Reduce glare by tilting the screen back slightly or repositioning your desk relative to windows.
- If you wear glasses, ask your optometrist about computer-distance lenses, which are optimized for the 20- to 26-inch focal range.
The 20-20-20 Rule and Movement Breaks
Proper sitting posture is essential, but the human body is not designed for sustained static positions regardless of how well-aligned they are. Movement breaks are not optional — they are a core component of desk ergonomics.
The 20-20-20 Rule
Every 20 minutes, look at something at least 20 feet away for at least 20 seconds.
This simple habit resets your eye focus, relaxes the ciliary muscles, and triggers a natural blink cycle that rehydrates your corneas. A 2023 study in the BMJ Open Ophthalmology journal found that consistent application of the 20-20-20 rule reduced computer vision syndrome symptoms by up to 64% over a four-week period.
How to build the habit:
- Set a recurring timer on your phone or computer.
- Use apps like EyeCare 20 20 20, Stretchly, or the built-in Focus features in macOS.
- Pair it with a sip of water — hydration also helps with dry eyes.
Micro-Breaks (Every 30 Minutes)
Every 30 minutes, shift your position:
- Stand up for 10 to 15 seconds.
- Shift your weight in your chair.
- Adjust your recline angle.
- Roll your shoulders backward five times.
These micro-movements prevent the static loading that compresses spinal discs, reduces circulation, and creates trigger points in postural muscles.
Movement Breaks (Every 60 Minutes)
Once per hour, get up and move for at least 2 minutes:
- Walk to the kitchen and refill your water.
- Do 10 bodyweight squats.
- Perform a standing hip flexor stretch (30 seconds per side).
- Walk up and down a flight of stairs.
A 2024 meta-analysis published in The Lancet found that breaking up prolonged sitting with 2 to 5 minutes of light activity per hour reduced all-cause mortality risk by 17% compared to uninterrupted sitting.
Desk Stretches You Can Do Right Now
Chin tucks (for forward head posture): Sitting upright, draw your chin straight back as if making a double chin. Hold for 5 seconds. Repeat 10 times.
Thoracic extension (for rounded upper back): Clasp your hands behind your head, elbows wide. Gently arch your upper back over the chair's backrest, looking up at the ceiling. Hold for 10 seconds. Repeat 3 times.
Wrist flexor stretch (for wrist tension): Extend one arm straight in front of you, palm up. With your other hand, gently pull your fingers downward until you feel a stretch along the underside of your forearm. Hold for 15 seconds per side.
Seated figure-four (for hip tightness): Cross one ankle over the opposite knee, creating a figure-four shape. Sit upright and gently lean forward until you feel a stretch in the outer hip of the crossed leg. Hold for 20 seconds per side.
FAQ {#faq}
How long does it take to correct bad desk posture?
Most people notice a significant reduction in discomfort within 2 to 4 weeks of implementing proper ergonomic setup and posture habits. However, reversing structural adaptations (such as shortened hip flexors or weakened deep cervical flexors from years of poor posture) typically takes 6 to 12 weeks of consistent corrective exercise alongside improved workstation ergonomics. The key is consistency — setting up your desk correctly is the first step, but maintaining the posture checks and movement breaks throughout each day is what produces lasting results.
Is it better to sit upright at 90 degrees or slightly reclined?
Slightly reclined is better. Research published in Spine by Bashir et al. found that a sitting angle of approximately 100 to 110 degrees (leaning back 10 to 20 degrees from vertical) reduces intradiscal pressure in the lumbar spine by up to 25% compared to sitting bolt-upright at 90 degrees. The key is that your back must be supported by the chair's backrest at this angle — reclining without back support simply shifts the load rather than reducing it. Set your chair's backrest angle and tilt tension so that it supports you in this slightly reclined position during normal work.
Should I use a standing desk instead of sitting?
A standing desk is a complement to proper sitting, not a replacement for it. Standing all day creates its own set of problems, including increased lower-limb fatigue, varicose vein risk, and foot pain. The evidence strongly supports alternating between sitting and standing throughout the day — a common recommendation is 30 to 45 minutes of sitting followed by 15 to 20 minutes of standing. A sit-stand desk gives you the flexibility to change positions based on your task and comfort level, which is the real ergonomic benefit.
What is the correct monitor height for someone who wears bifocals or progressive lenses?
If you wear bifocals or progressive lenses, the standard recommendation (top of screen at eye level) needs to be modified. Position your monitor 2 to 4 inches lower than standard eye level so that you can view the screen through the intermediate or reading portion of your lenses without tilting your head backward. Many bifocal and progressive wearers unconsciously tilt their head back to look through the lower portion of their lenses, which causes significant neck strain. You may also want to discuss computer-specific lenses with your optometrist — these are single-vision lenses optimized for your screen distance.
How do I know if my office chair is causing my back pain?
There are several indicators that your chair is contributing to back pain rather than supporting you: (1) your pain is worse at the end of the workday and improves on weekends or vacations; (2) you cannot sit comfortably with your back against the backrest — you either perch on the edge or slide down into a slouch; (3) the chair has no adjustable lumbar support and you feel a gap between your lower back and the backrest; (4) the seat pan is too deep, forcing you to sit forward to keep your feet flat; (5) you've had the chair for more than 5 years and the foam or mesh has compressed significantly. If two or more of these apply, your chair is likely a primary contributor to your discomfort. Our guide on the best ergonomic office chairs 2026 can help you find a replacement that addresses these issues.
Can a footrest really make a difference for posture?
Yes, and it's one of the most underrated ergonomic accessories. A footrest is essential when your desk is too high and you've had to raise your chair to bring your arms to keyboard height. Without a footrest, your feet dangle, your thighs press against the seat edge (restricting circulation), and your pelvis tilts backward (flattening your lumbar curve). An adjustable footrest restores proper lower-body alignment by supporting your feet at the correct height and angle. It also gives you a surface to shift foot positions on throughout the day, which promotes circulation and reduces static loading.
Conclusion
Sitting properly at a desk isn't complicated, but it does require deliberate setup and ongoing attention. The five golden rules — feet flat, lumbar supported, arms at 90 degrees, monitor at eye level, and back against the backrest — give you the foundation. The step-by-step setup guide ensures every piece of your workstation supports those rules. And the movement breaks ensure your body stays healthy even during long desk sessions.
The most common mistake isn't getting the setup wrong — it's setting it up correctly once and then gradually sliding back into old habits. That's why the posture reset check (every 30 minutes) and the 20-20-20 rule (every 20 minutes) are just as important as the physical setup.
Start with whatever change addresses your biggest source of discomfort right now. For most people, that's raising the monitor and adjusting the lumbar support. Those two changes alone eliminate the forward-head posture and slouching that cause the majority of desk-related pain.
Your body was built to move. The best sitting posture is always the next one.
Sources and Methodology {#sources-and-methodology}
- Nachemson, A. — The Lumbar Spine: An Orthopaedic Challenge, intradiscal pressure studies. Published in Spine, multiple editions.
- Bashir, S., et al. — Effect of Different Sitting Positions on Spinal Alignment and Disc Pressure. Published in Spine, 2006.
- Sharan, D., et al. — Risk Factors and Clinical Features of Computer Vision Syndrome. Published in BMJ Open Ophthalmology, 2023.
- Ekelund, U., et al. — Physical Activity and All-Cause Mortality: Updated Systematic Review and Meta-Analysis. Published in The Lancet, 2024.
- Occupational Safety and Health Administration (OSHA) — Computer Workstations eTool: Chairs, Monitors, Keyboards. United States Department of Labor.
- Cornell University Ergonomics Web — Ergonomic Guidelines for Computer Workstation Setup. Department of Design and Environmental Analysis.
- Canadian Centre for Occupational Health and Safety (CCOHS) — Office Ergonomics: Workstation Design and Sitting Posture Guidelines, 2025 revision.
{
  "@context": "https://schema.org",
  "@type": "Article",
  "headline": "How to Sit Properly at a Desk: The Complete Ergonomics Guide (2026)",
  "description": "Learn how to sit properly at a desk with our complete ergonomics guide. Step-by-step setup, posture fixes, the 20-20-20 rule, and expert product picks for 2026.",
  "image": "/images/articles/how-to-sit-properly-at-a-desk-hero.jpg",
  "author": {
    "@type": "Person",
    "name": "Dr. Michael Torres",
    "description": "Board-certified occupational health physiotherapist with 14 years of clinical experience"
  },
  "publisher": {
    "@type": "Organization",
    "name": "Office Chair Guides",
    "url": "https://officechairguides.com"
  },
  "datePublished": "2026-03-20",
  "dateModified": "2026-03-20",
  "mainEntityOfPage": {
    "@type": "WebPage",
    "@id": "https://officechairguides.com/how-to-sit-properly-at-a-desk"
  }
}
{
  "@context": "https://schema.org",
  "@type": "FAQPage",
  "mainEntity": [
    {
      "@type": "Question",
      "name": "How long does it take to correct bad desk posture?",
      "acceptedAnswer": {
        "@type": "Answer",
        "text": "Most people notice a significant reduction in discomfort within 2 to 4 weeks of implementing proper ergonomic setup and posture habits. Reversing structural adaptations typically takes 6 to 12 weeks of consistent corrective exercise alongside improved workstation ergonomics."
      }
    },
    {
      "@type": "Question",
      "name": "Is it better to sit upright at 90 degrees or slightly reclined?",
      "acceptedAnswer": {
        "@type": "Answer",
        "text": "Slightly reclined is better. Research found that a sitting angle of approximately 100 to 110 degrees reduces intradiscal pressure in the lumbar spine by up to 25% compared to sitting bolt-upright at 90 degrees. Your back must be supported by the chair's backrest at this angle."
      }
    },
    {
      "@type": "Question",
      "name": "Should I use a standing desk instead of sitting?",
      "acceptedAnswer": {
        "@type": "Answer",
        "text": "A standing desk is a complement to proper sitting, not a replacement. Standing all day creates its own problems. The evidence supports alternating between sitting and standing — 30 to 45 minutes sitting followed by 15 to 20 minutes standing."
      }
    },
    {
      "@type": "Question",
      "name": "What is the correct monitor height for someone who wears bifocals or progressive lenses?",
      "acceptedAnswer": {
        "@type": "Answer",
        "text": "Position your monitor 2 to 4 inches lower than standard eye level so you can view the screen through the intermediate or reading portion of your lenses without tilting your head backward. Discuss computer-specific lenses with your optometrist."
      }
    },
    {
      "@type": "Question",
      "name": "How do I know if my office chair is causing my back pain?",
      "acceptedAnswer": {
        "@type": "Answer",
        "text": "Key indicators include: pain worsens at end of workday and improves on weekends, you cannot sit comfortably with back against backrest, no adjustable lumbar support with a gap between lower back and backrest, seat pan is too deep, or chair foam has compressed significantly after 5+ years of use."
      }
    },
    {
      "@type": "Question",
      "name": "Can a footrest really make a difference for posture?",
      "acceptedAnswer": {
        "@type": "Answer",
        "text": "Yes. A footrest is essential when your desk is too high and you've raised your chair for proper arm positioning. Without one, dangling feet cause thigh pressure, restricted circulation, and backward pelvic tilt that flattens your lumbar curve. An adjustable footrest restores proper lower-body alignment."
      }
    }
  ]
}